If you are using an Android phone, you can now access your device storage directly from the file explorer on Windows 11, without required cables.
Traditionally, the transfer of files from your phone to your computer meant jumping via hoops, such as sending files by e-mail to yourself, using applications like WhatsApp, download on cloud storage services like OneDrive or Google One, or by physically connecting your phone via USB as a mass storage device.
Although these methods are still working, Windows 11 now offers a more transparent solution. Thanks to the integration of telephone links, you can browse and manage the files on your Android phone directly from File Explorer. The process is wireless, which means that it is not necessary to connect your device. Simply connect the two devices to the same Wi-Fi network.
It is important to note that wireless transfers come with certain limits. Due to bandwidth constraints, this function is best suited to browse the files or transfer a small number of documents, photos or videos, no lots of large files or multimedia folders.
In this practical guide, I will describe the steps to cover the storage of your phone from your computer without USB cables on Windows 11.
How to connect Android storage to Windows 11
If you want to access the storage on your wireless phone from Windows 11, you will need to configure the connection using the Settings application, telephone link, link to the Windows Mobile application and File Explorer.
Connect Android to Windows 11
To connect your Android phone to your Windows 11 computer, use these steps:
- Open Parameters.
- Click on Bluetooth and devices.
- Click on Mobile devices page on the right side.
- Light the “Allow this PC to access your mobile devices” Rocking switch.
- Click on Manage devices button.
- Quick tip: You may need to download the required components if this is the first time that you configure the functionality.
- Click on Add a device button.
- Open your phone and scan the QR code.
- Confirm the PC verification code on your phone.
- Quick note: This action will open the Google Play Store to install the link to the Windows application, which you will need to use the same Microsoft account you use on Windows 11 to connect the phone to your computer. If the application is already installed, continue with the instructions on the screen to connect and connect.
- Click on Continue button.
- Turn on the rocking switch to activate the connection with your phone.
- Light the “Show the mobile device in File Explorer” Rocking switch.
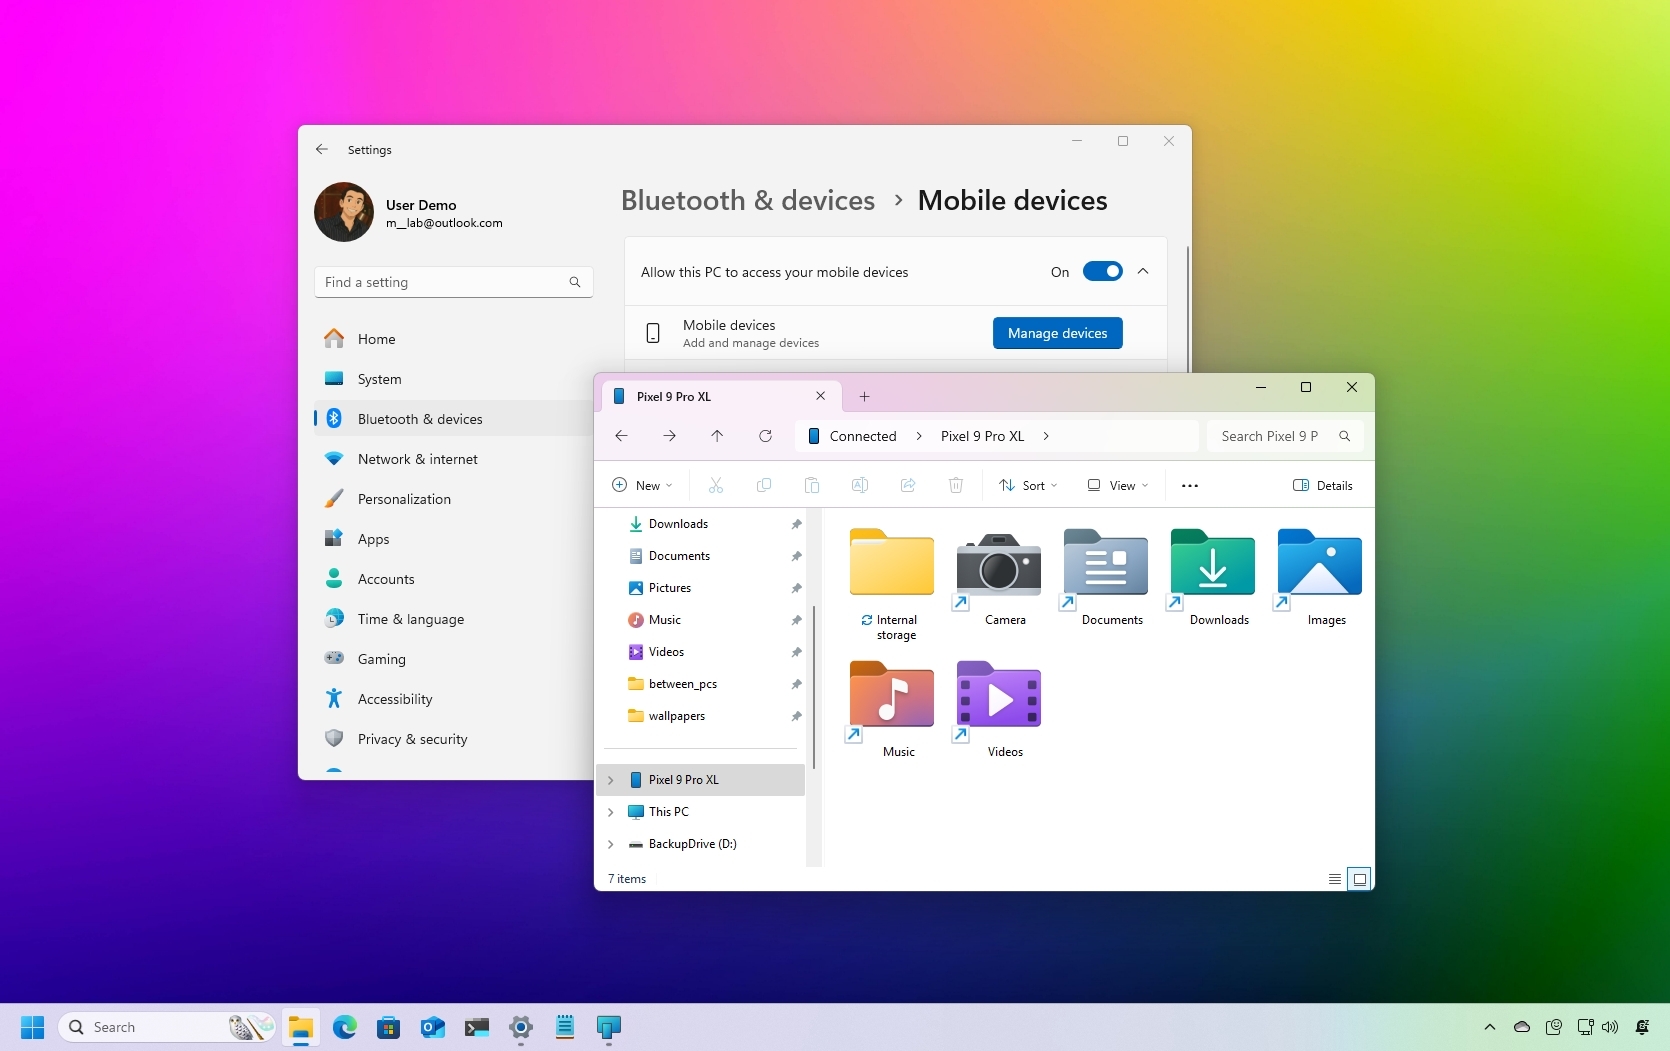
Once you have finished the steps, you should now be able to access your Android storage from File Explorer.
Browse Android storage
To access the storage of your phone from File Explorer, use these steps:
- Open File explorer.
- Click on your Android phone icon in the left navigation pane.
- Browse the internal storage of your phone.
- (Optional) Click on the phone icon on the upper left side.
- Confirm the use and storage capacity of your phone.
- Click on Refresh Button to reconnect storage.
- Quick tip: You may want to use this option if the files do not synchronize your computer on your phone.
- Click on garbage can Icon to access your phone recycling tank.
- Quick note: File Explorer will display files that have been deleted for 30 days, but consider that Android generally erases these files after five days.
Regarding the storage view for your Android phone, you will notice different shortcuts to access some of the known files, including cameras, documents, downloads, images, music and videos.
If you need to access other files, you will need to open the “internal storage” folder and from this location, you will have access to each file available without Root access, such as DCIM, alarms, notifications, Android and others.
More resources
Find in -depth guides, troubleshooting advice and the latest updates on Windows 11 and 10 here: