When Apple updates its iPhone operating system, it also updates many of the Apple apps that run on it. The big iOS 26 update that rolled out to millions of handsets in September comes with a useful new feature for Apple Maps.
The feature is called Visited Places and, as you might guess from the name, it keeps track of the places you’ve been. At first, this may seem like a privacy nightmare, but all of this information is end-to-end encrypted, so no one else can see it, not even Apple. (You can turn the feature off if you prefer.)
Places Visited is handy if you want to return to a place you love or want to remember a particular trip or vacation you took. You can also use it to recommend places to other people, from cafes to art galleries, as the app lets you share locations with just a few clicks.
If iOS 26 is installed on your iPhone, Apple Maps with visited places is included. Here’s how it works and what you can do with it.
How to configure visited places
The first time you launch Apple Maps after installing iOS 26, you will see a pop-up message explaining what the visited places are and asking if you want to enable it. Assuming this is the case, press ContinueSO Allowwhich allows Apple Maps to access a list of places you’ve visited (other apps can also access it, with your permission).
Next, you’ll see a dialog box asking how long you want your iPhone to store places after visiting them: 3 months, 1 yearOr Forever. If you’re a little more concerned about privacy, you can automatically clear locations after three months or a year, but that also means you won’t be able to recover locations from before that time. Make your choice and press Continue Again.
After that, you can continue using Apple Maps normally. The app will keep track of the places you’ve visited in the background, quietly compiling a list that you can refer to at any time. You need to be stopped at an identifiable location on the map for a short while for this to register. You won’t get a long list of every street corner and park bench you stopped at.
You obviously need to enable location services and GPS on your iPhone for this to work. Otherwise, your phone won’t know where you are. From the main iOS Settings screen, tap Privacy and securitythen choose Location Services to be checked. By turning the Location Services Turning the switch on or off here affects all apps on your iPhone, including Apple Maps.
A feature called Important Locations & Directions should also be enabled (which is by default). On the same Location Services page, tap System services And Important places and routes. This screen gives you a little more information about the locations your iPhone saves when you travel. You can see recently saved spots and clear that location history if you want.
How to use visited places
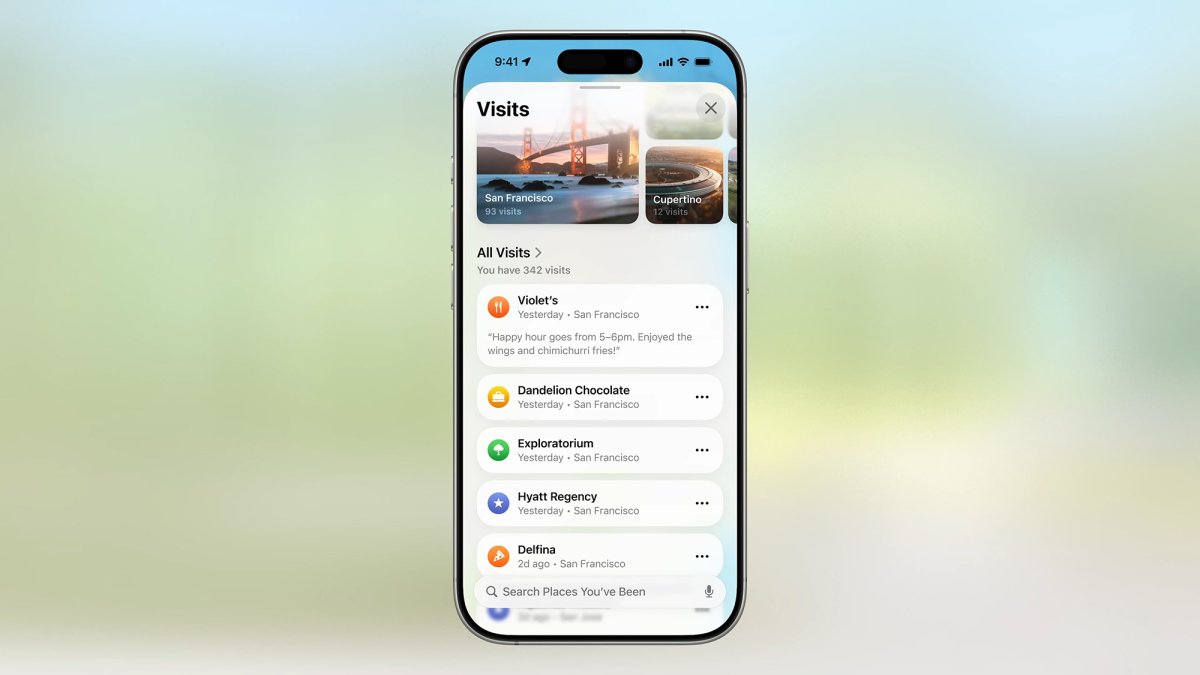
To access your visited places, go to Apple Maps and view the information map at the bottom, then tap Places And Places visited. You’ll immediately see a selection of places on the screen: you can use the search box at the bottom to search for something specific, or tap All Visits to see everything.
Apple Maps will also start organizing your places by dates, categories, and cities, once you start creating a larger list of places. You can tap these shortcuts to quickly access a list of places from a recent trip, for example, or to see all the restaurants you’ve visited. These shortcuts will be adapted to your own travel habits.
Each location in the list has three dots to its right: tap the dots to access more options. From the list that appears, you can share the location with someone else, remove a location from the list, correct its location if Apple Maps put it in the wrong place, or add a rating (what you thought of the food, perhaps).
Scroll to the bottom of the location list and you have two options: Keep the visitsto modify the retention period of the visited places, and Clear historyto clear your entire history in just a few clicks. In the next dialog box, you have the choice of disabling visited locations while also clearing the list of locations, or simply clearing the list.
As of this writing, the feature is still under a beta label, so you can expect to see it refined and tweaked over time, perhaps at the same time as Apple releases more updates for iOS. You can’t currently manually add a location to the list, for example, which would be a handy feature.